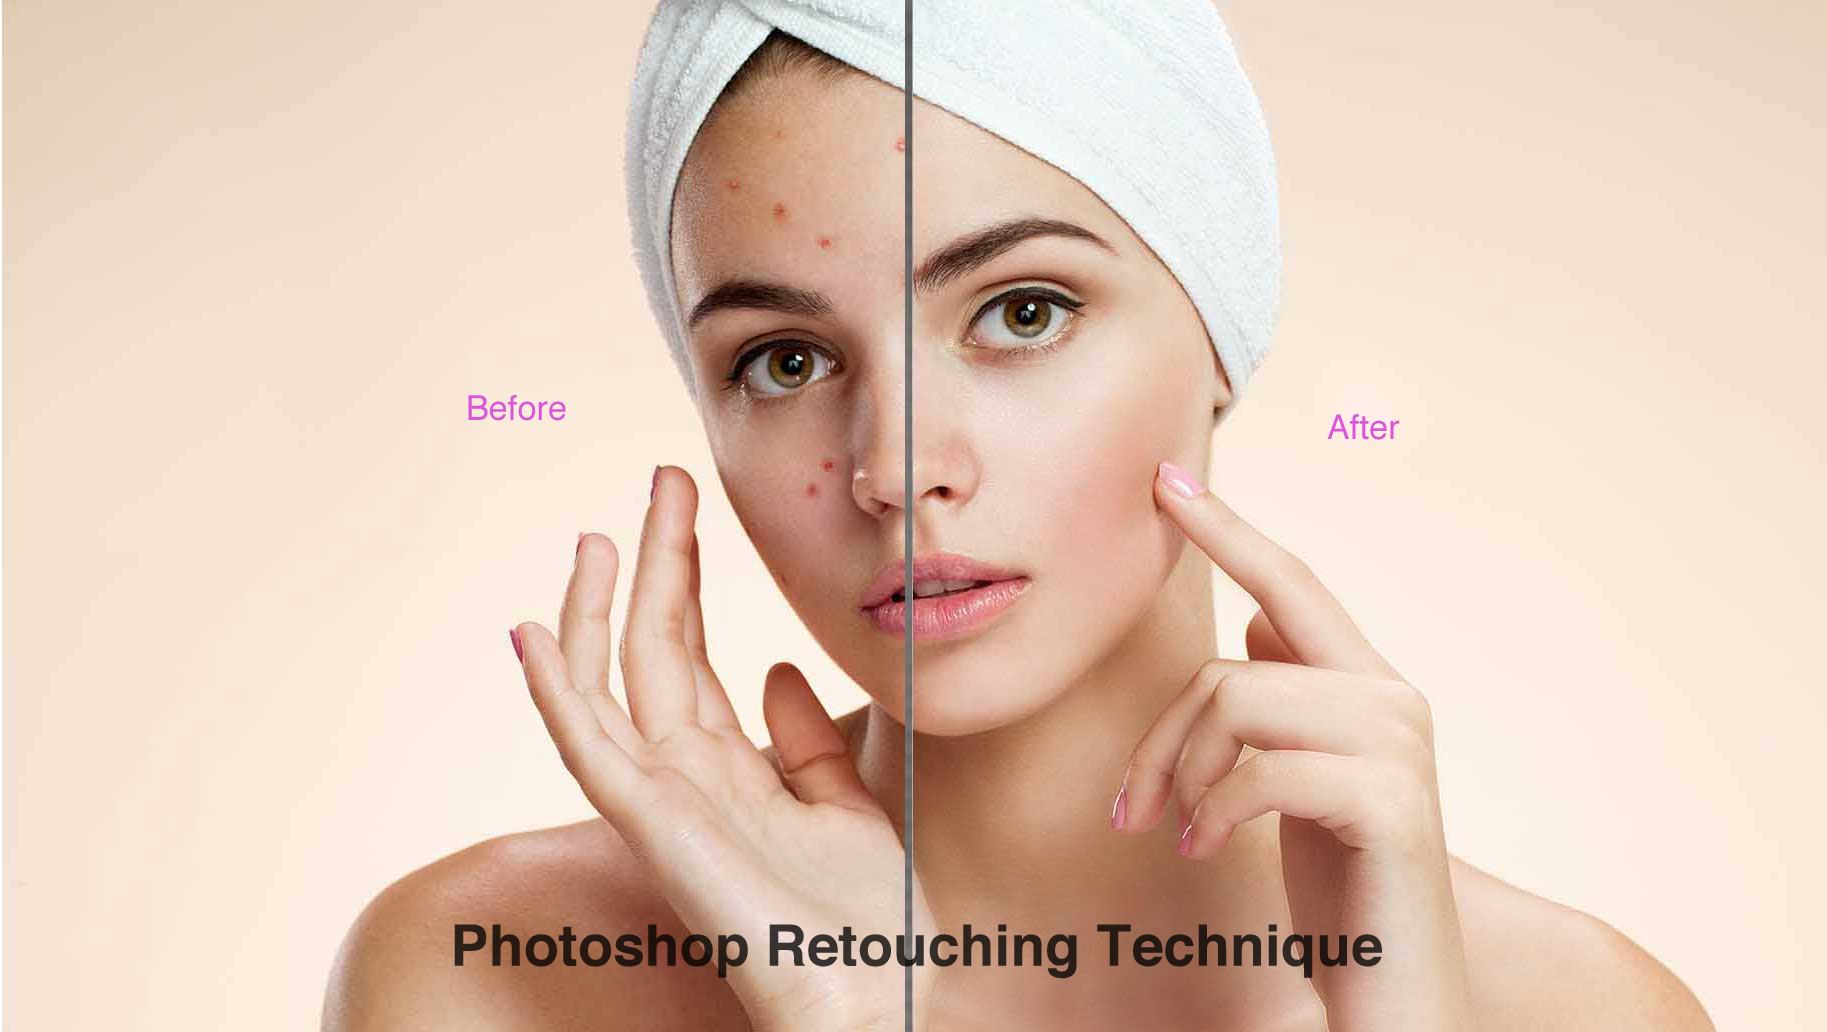
Photo retouching is a very important part of photography post-production. Nobody wants to publish their photos without retouching. Even professional photographers edit their raw images before publishing. Almost 90% of people use Photoshop for retouching photos. Because Photoshop Retouching techniques are very effective and unique.
Nowadays, photography is not just a hobby. Professional photographers and post-production services are earning money for living by this. So, the demand for photography and photo editing is raising day by day. In this case, photo retouching is the first and very important work in Photoshop. Many of us start learning Photoshop with Photoshop retouching techniques. At first, it seems a tough process, but gradually with the proper practice, you can learn all the photo retouching techniques very well.
If you are a beginner in Photoshop and want to learn photo retouching techniques quickly, this guide is for you. In this Photoshop Retouching guide, I will show you how to retouch a photo from first to last. If you follow this article very carefully, I promise you will be an expert at Photoshop retouching techniques.
In this step by step photo retouching guide, I will show you seven types of photo retouching techniques with relevant Photoshop tools. For your better understanding, first, I’m going to tell you about the steps to the point.
- Culling or selecting a perfect photo for retouching
- Spot healing with Photoshop spot healing brush tool
- Frequency Separation or adjustment
- Using the Dodge and Burn tool
- Eye Retouching
- Image tone adjustment
- Resizing and cropping
So, let’s begin our training and learn the Photoshop retouching technique.
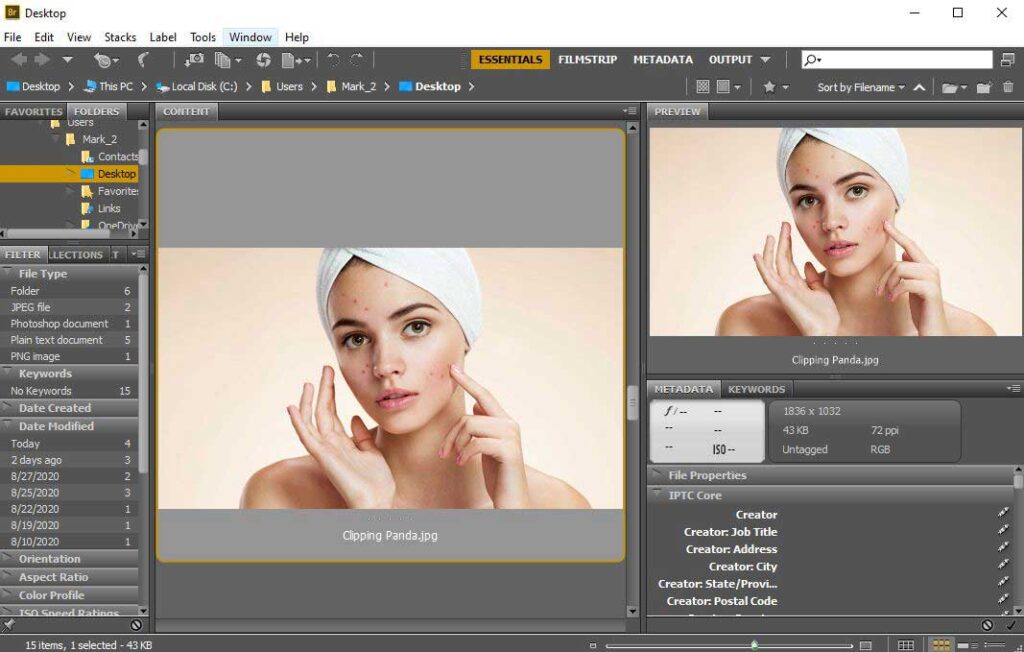
Culling the photos means selecting only the right pictures and get rid of the bad & unusable images. This process will save you valuable time and increase the workflow. You will find it very hard to select the perfect photo of so many photos. You may get confused and choose the wrong one. If you choose wrong, you will not find satisfaction in photo retouching. So, sorting out the perfect Image that you want to edit is essential. But to do this quickly, I recommend you to use Adobe Bridge or Lightroom. You can sort out your perfect Image for editing as bellow.
Culling the photos is very easy in Adobe Bridge. You just have to open Adobe Bridge first. Now browse the folder with pictures and navigate them by hitting the spacebar and use the arrow keys. Here, you can rate the photos by hitting any number between one and five. After that, hit the spacebar and press enter.
1. Culling or Selecting the Photo
Culling the photos means selecting only the right pictures and get rid of the bad & unusable images. This process will save you valuable time and increase the workflow. You will find it very hard to select the perfect photo of so many photos. You may get confused and choose the wrong one. If you choose wrong, you will not find satisfaction in photo retouching. So, sorting out the perfect Image that you want to edit is essential. But to do this quickly, I recommend you to use Adobe Bridge or Lightroom. You can sort out your perfect Image for editing as bellow.
Culling the photos is very easy in Adobe Bridge. You just have to open Adobe Bridge first. Now browse the folder with pictures and navigate them by hitting the spacebar and use the arrow keys. Here, you can rate the photos by hitting any number between one and five. After that, hit the spacebar and press enter.
2. Spot Healing Brush
The spot healing brush tool is a basic tool in the Photoshop retouching technique. It is the default healing tool, which use to remove various spots from the photo. This tool allows us to blend the sample area with the color and luminosity of the Image.
There are five types of Spot Healing Brush tools. They are:
- Spot Healing Brush Tool
- Healing Brush Tool
- Patch Tool
- Content-Aware Move Tool
- And Red Eye Tool
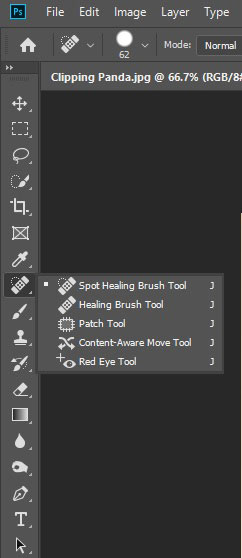
But, in retouching, we will mainly use the brush tool. Suppose, the picture you are retouching have many blemishes and spot on the face. So, if you want to remove those spots, just open the Image in Photoshop. Now, select the spot healing brush from the Toolbar you can see in the screenshot. After that, you will see the brush option on the top bar in Photoshop. With the brush option, you can increase/lower the brush size and hardness.
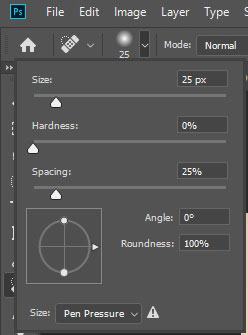
Now, it’s time to remove the spots with that brush. Just remember that excessive brushing may spoil the Image and careful about the hair.

Spot healing tool is very easy to use and also important. All you need is to practice more to learn this Photoshop retouching technique. Then you can remove the spots as the professionals do.
3. Frequency Separation
Frequency separation is a Photoshop technique for bringing smoothness in the skin. This is a very popular process for making the skin smoother and attractive. Usually, portrait photographers follow this process for retouching their photos.
Stay with me until the end of the article, and I will show you the easiest way to Frequency Separation. After reading this guide, you’ll be able to make smooth skin in Photoshop without losing the texture.
In this process, we will use the Frequency adjustment filter to make smooth skin. First, open the Image in Adobe Photoshop. Now, duplicate the background layer and name the layer as High-Frequency Texture. Again, copy this layer with the name Low-Frequency Blur. See the screenshot for a better understanding of this Photoshop retouching technique.
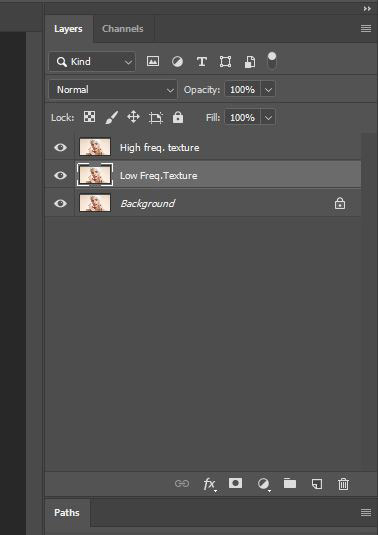
Now, we are going to use Frequency Adjustment Filter. But before that, select High-Frequency Layer and turn the eye off to disable it.
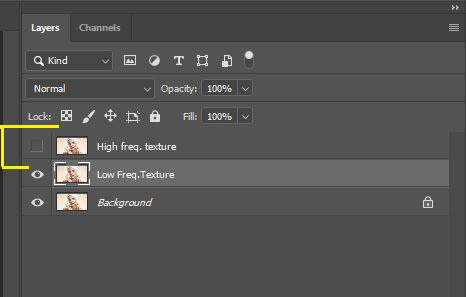
In the next step, select Low Frequency texture layer. Then choose Gaussian Blur from the Blur option. A pop-up tab for Gaussian Blur will appear on the screen. From there, adjust the radius.
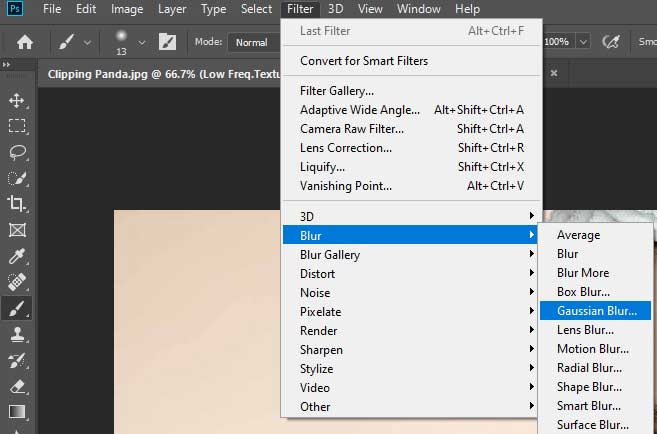
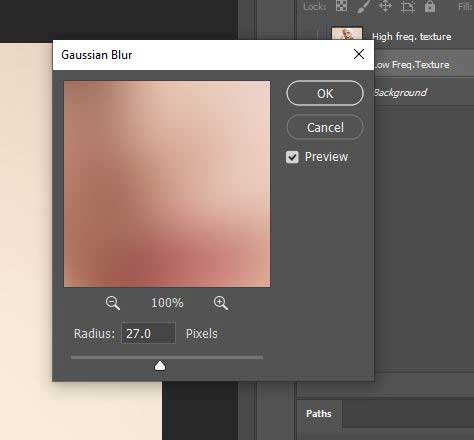
Now select High Frequency Texture and turn it on. Again, go to the top bar, and select Image then Apply Image. Now a pop-up tab will open for Apply Image. Here, you have to change the Background layer into Low Frequency. Now change the Blending option as Subtract. Keep Offset 128 and Scale 2. Then press Ok. Then turn on High Frequency and choose Linear Light from the menu at the top of the layer box.
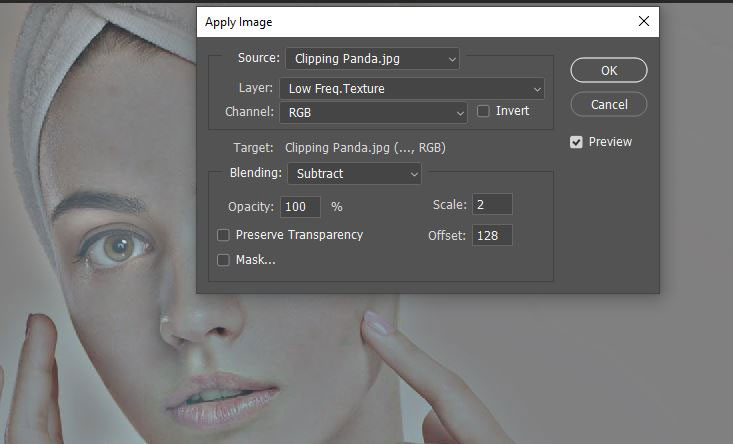
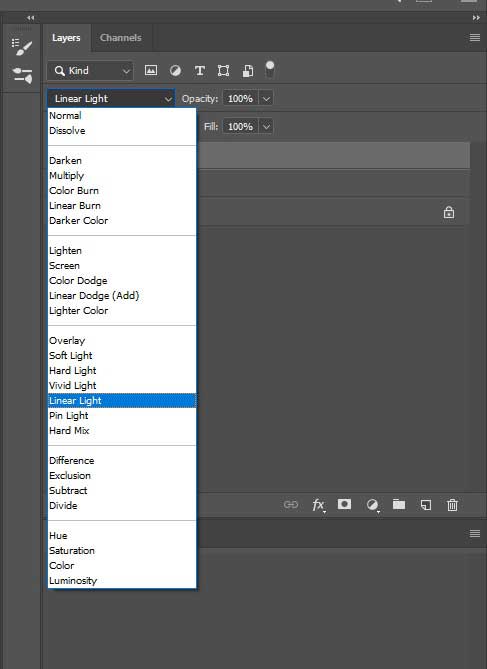
We are almost there. Now what you have to do is select the Lasso Tool from the Photoshop Toolbar. Zoom the photo in where you want to use this. You can just press ‘J’ as a short cut to zoom the Image. Select the area that you want to make smoother with the Lasso Tool. Now feather it 25-30 pixel whatever you need. Then Deselect pressing Ctrl+D. Now draw another selection in there with the Lasso Tool and go to Filter then select Gaussian Blur from the Blur option. Adjust the radius, then click Ok. Now you can adjust the frequency for every part of the photo wherever you want. Just press Ctrl+F, which is the last filer you used. Again, deselect and select another portion. Just remember, don’t select too close to the hair or eye or neck.
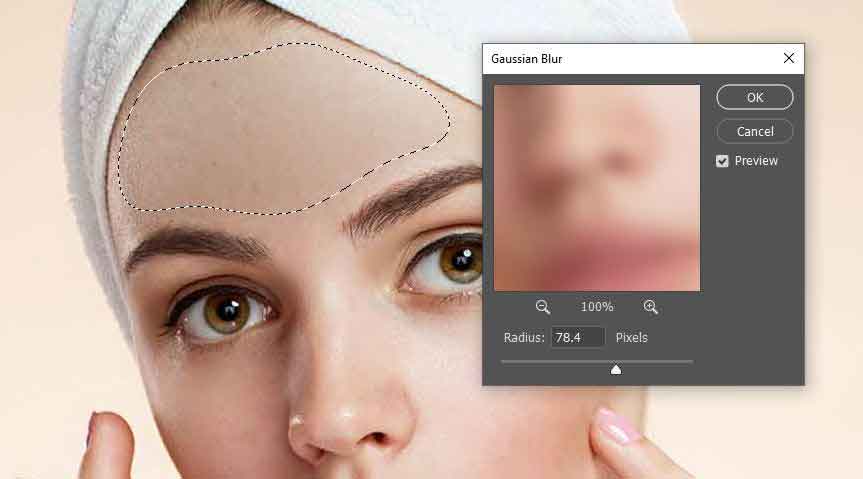
Though it’s a little long process but not that hard. You can easily use frequency separation technique by practicing more and more. Frequency Separation is the most effective technique in Photoshop Retouching Technique.
4. Dodge and Burn Tool
You can easily adjust the brightness and darkness with Dodge and Burn Tool in Photoshop. This is a fantastic tool to fix the color tone of the Image. It allows us to increase or decrease the amount of light in a specific part of the photo. Though it sounds very easy to do, there is some complexity.
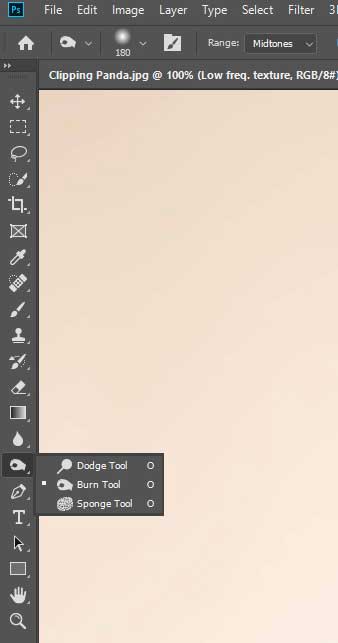
If you directly apply it to the background layer, then you may destroy the photo. You have to create a different layer. One for dodge and another for the burn. You can enhance the brightness of the photo with the Dodge Tool. And if you want to decrease the brightness that is too much in some part, you can use burn tool. These two tools are the advanced versions of the Photoshop retouching technique. They used to lighten underexposed areas of a photo or darken overexposed areas.

5. Eye Retouching
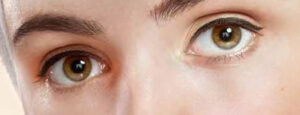
Eye Retouching is the most important part of model retouching. Eyes are the mirror of the soul. So, the beauty of a photo depends on the eye. Sometimes your photo may need eye bag removal or color change. Eye retouching techniques in Photoshop can help you in that case. In beauty retouching, we need this technique most. Viewers first notice at the eye. Photos will seem unrealistic if the eyes are too dark or blurry. Mainly brush tool and layer masking is used to retouch eyes.
6. Image Tone Adjustment
Image Tone Adjustment is very necessary for the photo. Toning like coding a massage in the Image. This technique makes changes in how viewers feel about the Image. Toning means changing the color and contrast in the Image. You can use a color filter as you like in this process. In this Photoshop retouching technique, you can turn an ordinary image into a great one by changing some elements. It is not that easy task. You need more practice to create a perfect tone in the photo.
7. Resizing and Cropping
Like all the other Photoshop retouching technique, resizing and cropping is also very important. We all know what is resizing and cropping. If you don’t know yet, read this article until the end, you will know. You can give any size in your photo. If you want to decrease your image size, you can follow this technique. Sometimes you may want to increase your file size. So, you can do both with this Photoshop retouching technique.
Let’s see how to resize a photo in Photoshop.
- First, open the photo in Photoshop.
- Select Image Size from the top bar in Photoshop. Press Alt+Ctrl+I
- Now, to change the photo dimension, select your preferred dimension from the drop-down menu.
- You can customize the Width, Height, and Resolution here.
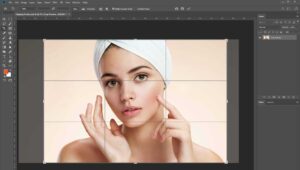
Sometimes, the photos may need to crop the surrounding, bottom, or the top. Cropping is also a part of the Photoshop retouching technique. If you want to cut a part of the photo from one side, you need this tool. Cropping is very easy. Anyone can use it. If some of you still don’t know, then I’m showing you how to do cropping.
- Open the photo using Photoshop.
- Select the Crop tool from the Toolbar. Press C.
- Drag the cursor with the mouse from the point in the photo you want to keep.
- Press Enter. Now the unwanted part of the photo is gone.

Conclusion
I’m hoping that you will learn at least something from this article. I was trying to give a basic idea about the Photoshop Retouching technique for beginners. If you are a beginner, then you must find this article helpful. You can start practicing the steps. So, that you can develop your skill in Photoshop retouching technique. These seven steps of the Photoshop retouching technique are the main steps for retouching. Follow these steps, and you can be an expert in Photoshop retouching.
In the future, I will write about more advanced Photoshop techniques here at Clipping Panda Creative Photoshop Service. And if you are looking for Creative Photoshop Services for your post-production, then you can prefer us because Clipping Panda is the best Photoshop Service. We provide high-quality Photoshop services at a very reasonable rate.
Photo retouching is the process where we can remove dust, imperfection in photo using adobe Photoshop. Retouching applies to remove spots, enhancing brightness, fixing image quality, etc. Photoshop retouching technique is used to retouch the photo to make them faultless and attractive.
Using Photoshop Dodge and Burn tool, it is possible to remove skin darkness or enhance brightness.
There are many photo editing apps. But for retouching, Adobe Photoshop is the best.
To activate the Zoom tool in Photoshop, you just have to press ‘Z.’ Then click the right button of the mouse to zoom in. You can Zoom out with the Alt+right button of the mouse.

