Frequency separation is a technique frequently used in beauty touch-ups, mainly to clean your model’s skin of minor facial blemishes, although it can also apply to remove stubborn hair, blemishes, small scars, etc.
Also you need care your teeth whiten for professional work. See relative post: How to whiten teeth in photoshop
Its main attraction is that it allows us to leave a “perfect” skin but preserving its texture, which gives our photography a natural and realistic finish.
By following a few simple Photoshop steps, you will be able to obtain precise results worthy of a professional touch-up.
What is the frequency separation?
Frequency separation is a professional skin retouching technique. It is the technique most used by professionals in fashion magazines. Why? For its magnificent results.
Surely you have seen more than once skin touches so aggressive that they have softened a model’s face until it is as smooth as the peach’s skin. They are so unreal because the skin has texture, and if it disappears, the photograph is unnatural.
As they say, an excellent touch-up is not noticeable, and that is why frequency separation is so popular with professionals.
This technique separates the texture and color of our photography into two layers. Thus, we can touch up the skin without destroying its texture/surface to leave it perfect but with a natural and realistic appearance.
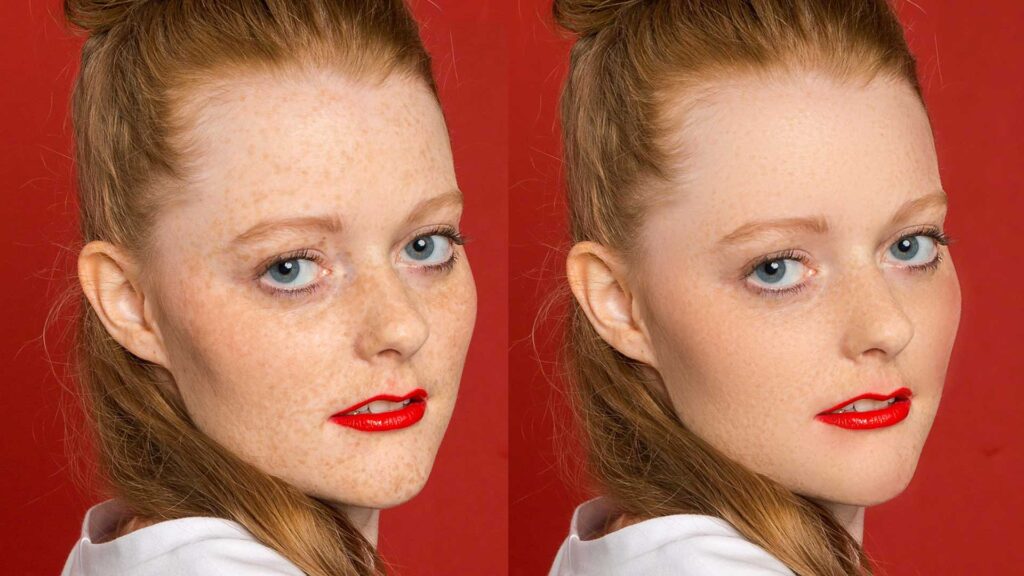
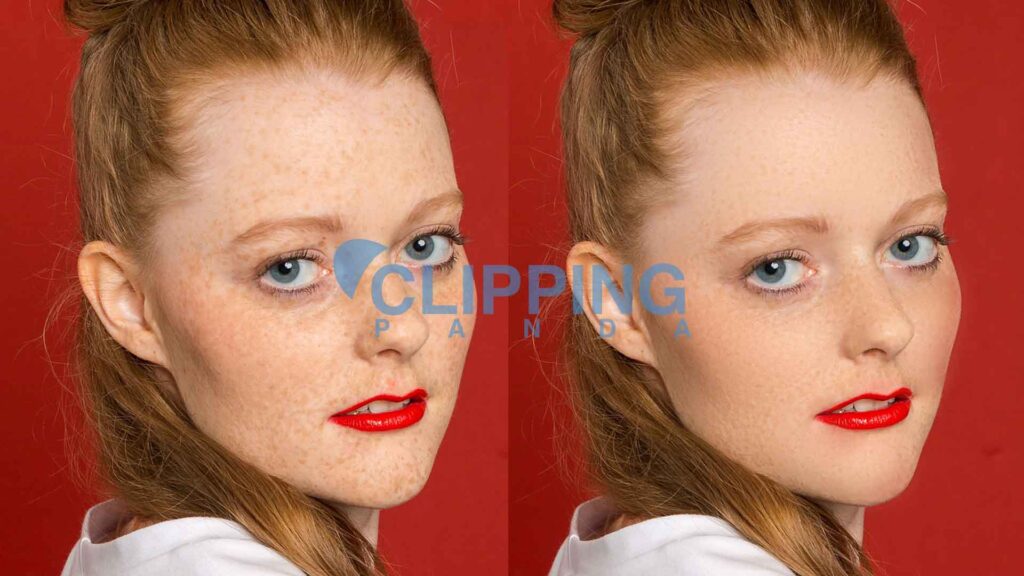
Next, we will see step by step how to get it. For example, we are going to touch up this photograph. As you can see in the cutout, the makeup has been very cracked, giving rise to skin that looks quite ugly. With the frequency separation, we will get to leave it much better, but without losing its natural texture.
Frequency Separation A Step by Step Guide: Beginner to Pro
1. Create Layers
First of all, we must duplicate the layer twice, from the Layer / Duplicate layer menu or by pressing the keyboard shortcut (Ctrl + J) Although it is not necessary, I usually put these two layers in a group to be able to activate and deactivate them and thus check how the touch-up is turning off and on the icon of the little eye that we will find in front of the group folder.
To clarify, we will call the top layer Texture and the bottom layer Color. The top layer will contain the texture of our photo and the bottom layer of the blur.
2. Separate the Frequency
Now is when we are going to separate the frequencies of our photo. Go to the Color layer and apply a blur to it from the Filter / Blur / Gaussian blur menu.
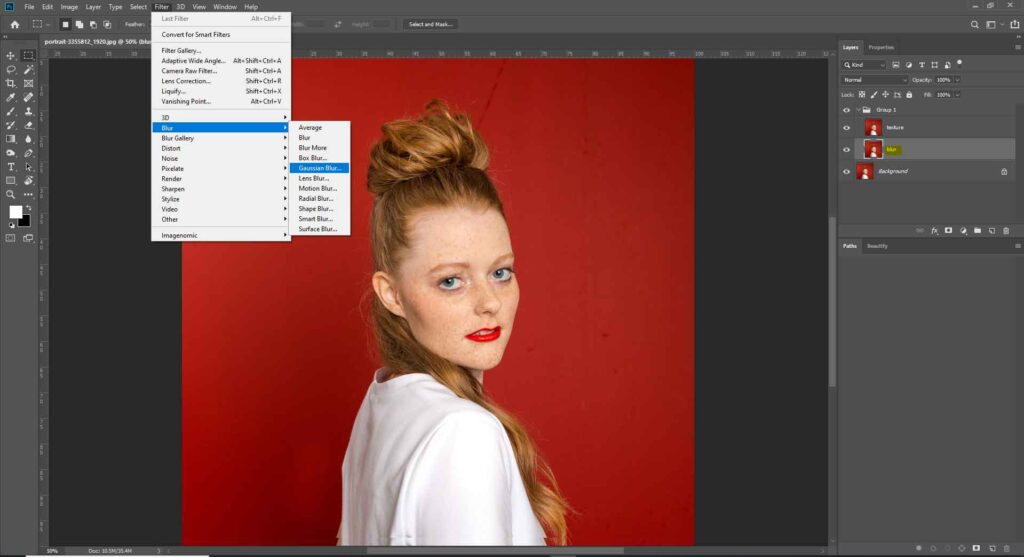
Although some people usually give it between 4 and 8 pixels of a blur, in this image I use 4 pixel radius. So if you add more blur now, you won’t get it all back, and we’d be losing definition. Indeed, it is not too much, but well, it is always interesting to keep the maximum sharpness possible.
Now select the Texture layer and go to the Image / Apply Image menu. We will change the following parameters:
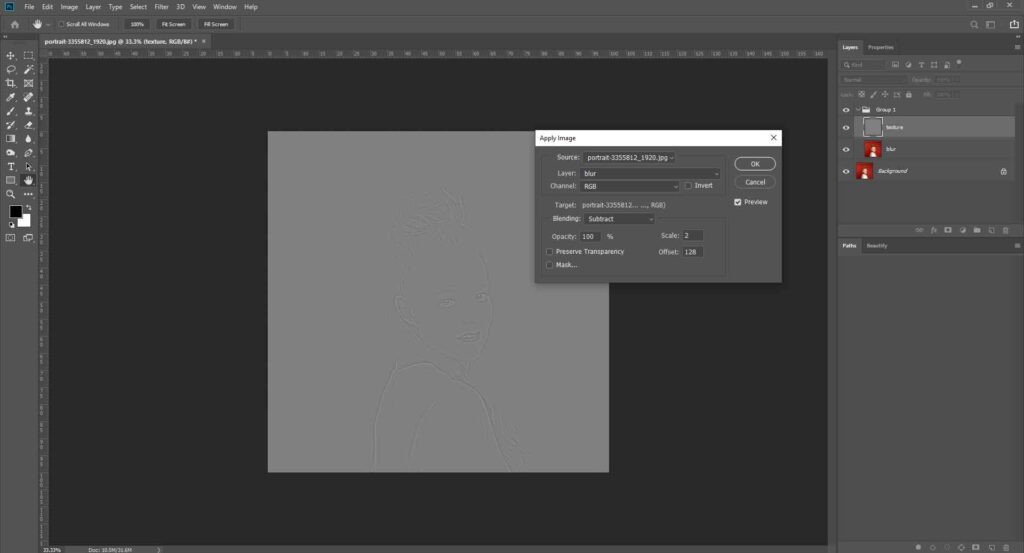
- Layer: We will select our blur layer.
- Channel: We leave it in RGB
- Blending Mode: Subtract
- Set Scale 2 and Offset 128
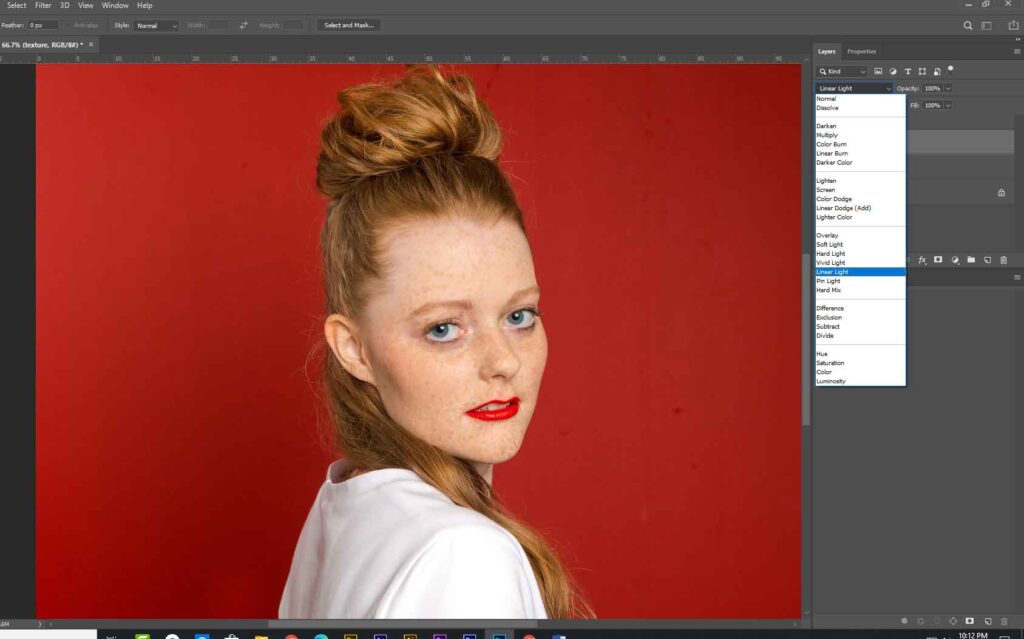
If you have done everything right, the image will be gray with slightly outlined contours. Don’t worry; now we’re going to make this look good by changing the Blend Mode of the layer. Make sure you have the Texture layer selected, and above it, in the layers window, you will see a dropdown that says “Normal”. Please open it and change the blending mode to Linear Light. we’re just keeping her skin texture.
Now you will have your photo with a healthy appearance. If you have done well, turning the group’s eye on and off should not notice any changes; at most, a very slight variation in the contrast of the photograph.
3. Retouch the Skin
Now that we have separated the frequencies, it is time to start retouching the skin. Frequency Separation is a challenging but straightforward process. By this, I mean that it will not be difficult to do, but it will take a long time if we want to do it well.
This retouching will consist of two parts. On the other hand, we will touch up the texture and, on the other, the color of our photography. Although there will be two processes that we will carry out separately, there are indeed some imperfections that will contain information in both the texture layer and the color layer, so we must touch them up in both layers. I case, for example, hairs, relatively large pimples, very pronounced wrinkles, very light or very dark scars, moles, or eye veins.
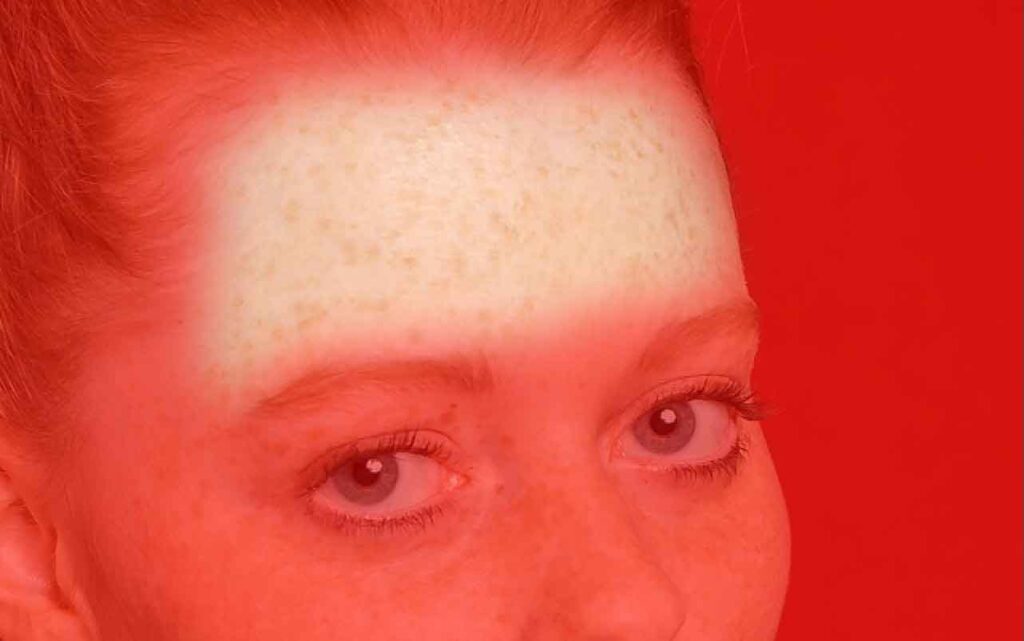
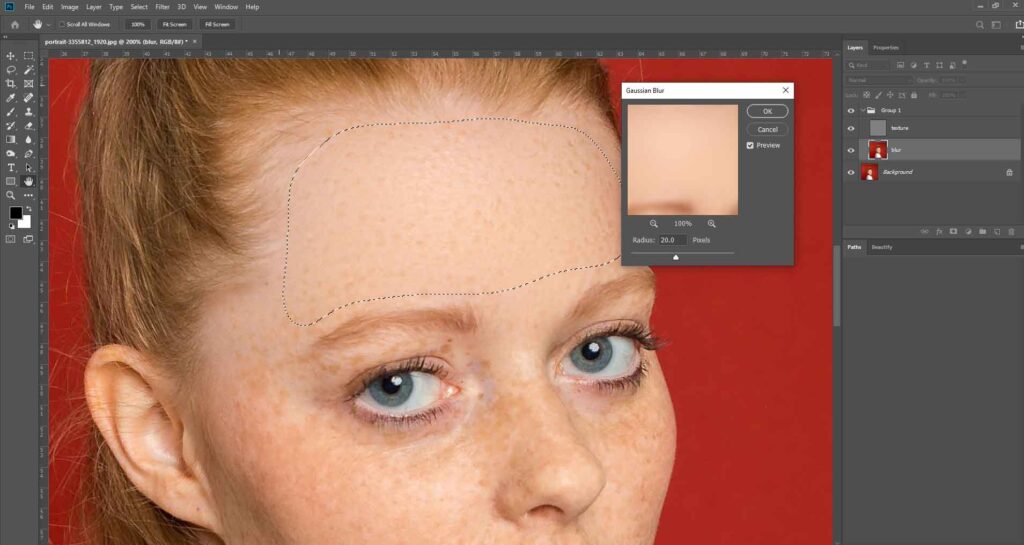
Switch to the blur layer, and now we’ll grab the Pen Tool/selection tool to separate the area. Here’s what we’re going to do. We’ll divide her face into several regions and we’ll apply another blur to each part. Here’s how the process going to go.

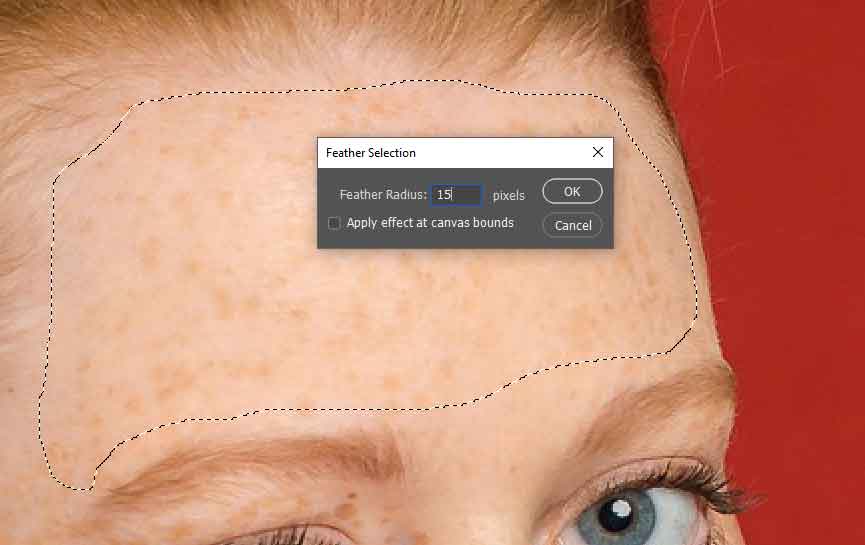
Gaussian Blur:
Select the small area and feather radius 15. make Gaussian blur radius 20 px. Do it all the entire area.
4. Frequency Retouching:
Select the texture layer and start retouching using clone stamp tools. Keep the opacity 50%. We will use a tiny size, the smaller, the more accurate the touch-up and the more natural it will look. Ideally, it should be the same size as the skin pores that we are going to clone. That is why this technique is so difficult because we are going to clone the most beautiful and closed pores, on the most open pores, or other imperfections.
Some people prefer to add a black and white adjustment layer and even some of the levels or curves to highlight the texture more and help touch it up better. If you decide to use this method, then you should remove them when you’re done.
5. Final Adjustments
This process can be complicated, and you may not even know when to finish. Everything will depend on the final size at which people go to see your photograph; it will not be the same to post it on Facebook as to upload it to a large scale on a platform like Flickr or 500px.
Finishing these processes, turn off the group layer’s eye that we have created for frequency separation. So you can observe all the changes, to detect if there is something you have forgotten or a retouched area that you do not like.
Finally, you can also try lowering the frequency separation group’s opacity a little if you want to give your photography a more natural look so as not to leave the skin “too perfect”.
Dare to Try Frequency Separation!
Yes, it can be a hard process for beginners, but it is worth it. Skin will never be as perfect as with the frequency separation. In more distant portraits it may not be necessary if we are going to see the photograph at “web size”, but without a doubt for very close portraits shot, frequency separation is the technique that will offer you the best results.
So lose your fear of retouching, and dare to try frequency separation!
Yes. We offer frequency separation services. Send us get quote request for your project.
Cost depend on your image complexity. Generally we charge hourly $10-$15 for frequency separation editing.