One of the common problems in photography is noise or grain due to using high ISO. Nobody wants to capture a noisy image. But sometimes we have to take photos with noise. And there is nothing we can do with the camera to reduce noise. But after capturing the photo, Adobe Lightroom allows us to reduce noise from the photo. With Adobe Lightroom, you can make the photo smoother with high-quality details. In this tutorial, I will show you how to do noise reduction in Lightroom efficiently step by step.
What is Noise in Photography?
The grainy and dotted texture in the photo is called digital noise. Usually, the darkest areas of the photo have this texture. As an example, you can compare the shadows in night photography.
Normally, higher ISO captures brighter images. So, when you increase the ISO that means the light sensitivity of the camera also captures more noise. But noise is a common part of photography from the beginning. There will always be some noise in the photo. The advanced digital cameras are improving day by day to solve this problem. But you will still need the lightroom technology to reduce noise completely.
Noise Reduction in Lightroom Step by Step Process
A photo contains various types of noise. Among them, luminance noise, color noise, and selective noise are the most annoying. so, let’s have a look at how to reduce all of them in Lightroom.
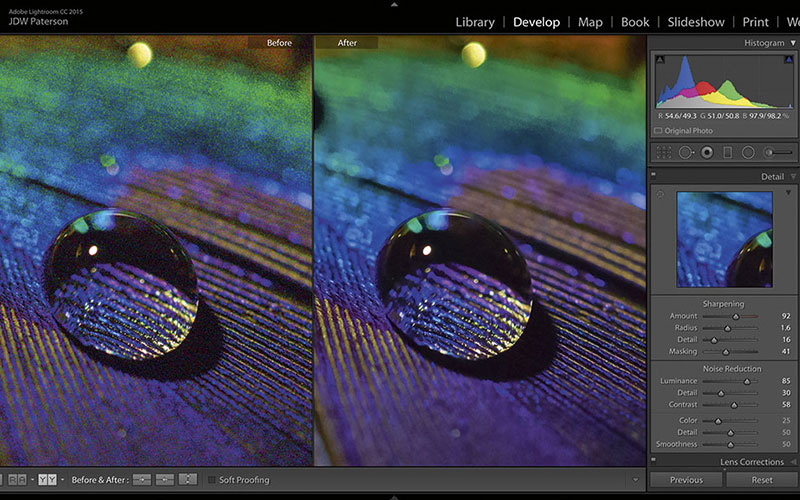
Step 1: Luminance Noise Reduction
This is a tonal noise and appears in the shadows and darkest parts of a photo. When the pixels have gone misfired to the wrong tone it happens. With Lightroom, this kind of noise can be easily retrieved.
I have outlined the steps to reduce luminance noise one by one below.
- Open the photo in Lightroom which has luminance noise
- Zoom in up to 100%. You may need to zoom up to 300% sometimes.
- On the right side of Adobe Lightroom, look for the Detail panel and scroll down. Now you will see the noise reduction option.
- Now, set details to 100% with the slider under Noise Reduction.
- Then set Luminance to 100%
- Now, slide again the details slider to back until artifacts vanish
- In the details area, go to the Luminance slider and slide it back until the details return
- If your photo has extreme noise then use the Contrast slider.
Step 2: Color Noise Reduction
When the pixels of the photo are miss-reacted with the wrong color then the color noise appears. Most of the time it shows up in the shadow parts as blotches. You can desaturate the shadows with the color slider under noise reduction. Move it until the noise disappears. In this case, leave the details slider as it is now ineffective here.
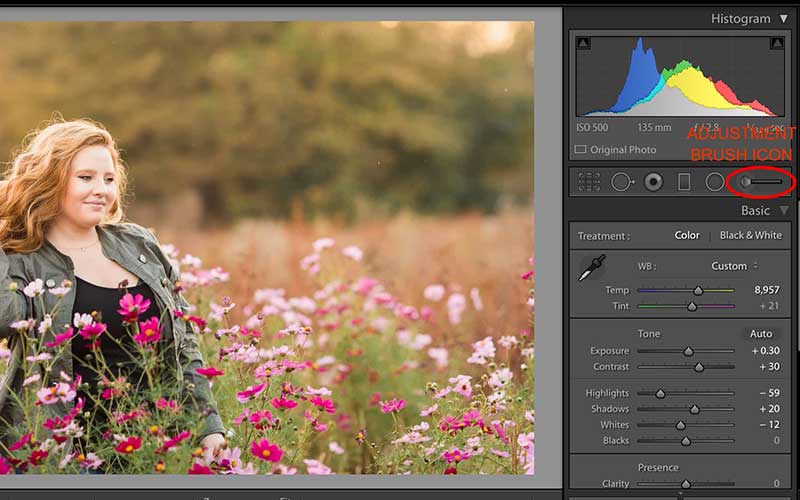
Step 3: Selective Noise Reduction in Lightroom
Sometimes you may lose the detail by applying the previous steps. If you add clarity and sharpness noise increases in lockstep. But to make a balance you have to use enhancements that enhance only certain parts of the photo.
In the Lightroom, three amazing tools will allow you to adjust the noise in only the areas where these tools affect. Using Radial Filter, Gradient Filter and the Adjustment Brush have those sliders. It will be very effective if you use the adjustment brush. It gives you selective control while applying adjustments though it takes some time.
In Lightroom, open the Develop module. Under the histogram, you will see a series of icons. Click on the Adjustment Brush then slide the slider that is labeled noise. Dial it down then brush over selected parts that are noisy.
Conclusion
Hope you can keep your photos noise-free by following this tutorial. By following the steps properly, you can make your images look great! There is also third-party software available to handle noise reduction. But in Lightroom, you will achieve the finest result. Lightroom provides an effective solution to reduce noise. It is very easy to disappear noise and grain in Lightroom.
Usually, a photo has electronic noise. And these digital noises are produced when you use high ISO to capture bright images. Sometimes, It can be produced by the image sensor and circuitry of a scanner.
If your photo has noise, you can calculate it by the Distance vector D from the image histogram. The histogram of an image describes the intensity value of noise.