The Photoshop Slice Tool is a great tool that enables users to separate a layout or image into multiple sections. These “slices” can be exported individually or together to make them perfect for web page layouts, social media images, and UI elements. In this post, we will show you how to use the Photoshop Slice Tool.
How to select the slice tool
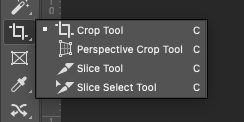
In Photoshop, you can find the Slice tool in the left toolbar. You can quickly access the Slice tool by pressing the “C” key on the keyboard. By default, it will display the Crop tool. then click the right bar and select the slice tool from dropdown. See the screenshot below.
How to Use the Slice Tool
Now that we have selected the Slice Tool, you can manually create slices across your design.
To create slices:
In this tutorial, we open a webpage sample. Our task is to create or separate these webpages into three different sections. Header, Body, and Footer areas and rename them accordingly. After that, we will export them.
Watch the video tutorial: How to Use the Slice Tool.
Why Use the Slice Tool?
- To Export Specific Sections: If you want to export particular parts of a design, such as icons, banners, or buttons, the Photoshop slice tool can be helpful.
- Creating a link to each section: We can create a link for each section, which could be an excellent feature for designers, collaboration, and clients to view a live demo project.
- Loading Speed: By creating multiple slices or pieces, you can increase the web loading time.
Exporting the Slices
After creating slices, we will rename it and follow the steps to export them on our computer.
1. From the top menu, go to File > Export > Save for Web (Legacy).
2. Select the export format (JPEG, PNG, or GIF).
3. Click “Save” and select “All Slices” or “Selected Slices.”
You just did it.
Conclusion
The Photoshop Slice Tool is an excellent tool for designers, especially for Web Designers and UX/UI Designers. It will break down large pages or documents into smaller parts. The Photoshop slice tool makes it easy and increases the loading speed.